When your Mac fails to boot after a system update, it can be a frustrating experience that leaves your device seemingly unusable. This comprehensive guide will walk you through the complete process of using Apple Configurator to restore your Mac system when traditional recovery methods fail. Whether you’re dealing with a corrupted firmware update, stuck boot process, or system files that won’t load, this step-by-step tutorial will help you get your Mac back to working condition using professional recovery techniques.
Understanding Mac Boot Failures After System Updates
Mac boot failures following system updates occur more frequently than many users realize. These issues typically manifest as devices that get stuck during startup, display error messages, or fail to complete the boot sequence entirely. The root causes often include incomplete firmware installations, corrupted system files, or hardware conflicts that arise during the update process.
Apple Configurator serves as a powerful diagnostic and recovery tool that can communicate with Macs in various states of system failure. Unlike standard recovery modes that require a functioning operating system, Apple Configurator can interface with devices in Device Firmware Update (DFU) mode, making it invaluable for severe system recovery scenarios.

Prerequisites and Requirements
System Requirements
- A second Mac running macOS Monterey (15.6) or later
- Apple Configurator 2 (version 2.18 or newer) installed on the helper Mac
- USB-C to USB-C cable or appropriate connector for your Mac model
- Administrative privileges on the helper Mac
- Stable internet connection for downloading recovery firmware
- At least 10GB of free storage space on the helper Mac
Knowledge Prerequisites
- Basic understanding of macOS system recovery concepts
- Familiarity with DFU (Device Firmware Update) mode
- Knowledge of Mac hardware connection types and ports
- Understanding that this process will erase all data on the target Mac
Step-by-Step Apple Configurator Recovery Process
Method 1: Initial Device Recognition and DFU Mode Entry
The first step involves establishing communication between your failed Mac and the helper Mac running Apple Configurator. This process requires entering DFU mode, which bypasses the normal startup sequence.
# Ensure Apple Configurator is properly installed
# Launch Apple Configurator 2 from Applications folder
# Connect the failed Mac via USB-C cable while powered off
# Hold the power button for 10 seconds, then release while keeping USB connected
When successfully entered, DFU mode will display your Mac as an unidentified device in Apple Configurator. The interface should show the device with a generic icon and “DFU” status indicator, confirming that the hardware is communicating but the operating system is non-functional.
Method 2: Alternative DFU Mode Entry for Different Mac Models
Different Mac models require specific key combinations to enter DFU mode effectively:
For MacBook Air and MacBook Pro (2018 and later):
- Connect USB-C cable between Macs
- Press and hold Power + Volume Down + Volume Up for 10 seconds
- Release all buttons while maintaining USB connection
- Device should appear in Apple Configurator within 30 seconds
For Mac Studio and Mac mini:
- Disconnect all cables except power
- Connect USB-C cable to helper Mac
- Hold power button for 10 seconds while connecting USB-C
- Continue holding for additional 5 seconds after connection
Navigating Apple Configurator Recovery Options
Once your Mac appears in Apple Configurator, you’ll have access to several recovery options through the right-click context menu. Understanding each option’s purpose is crucial for successful recovery.
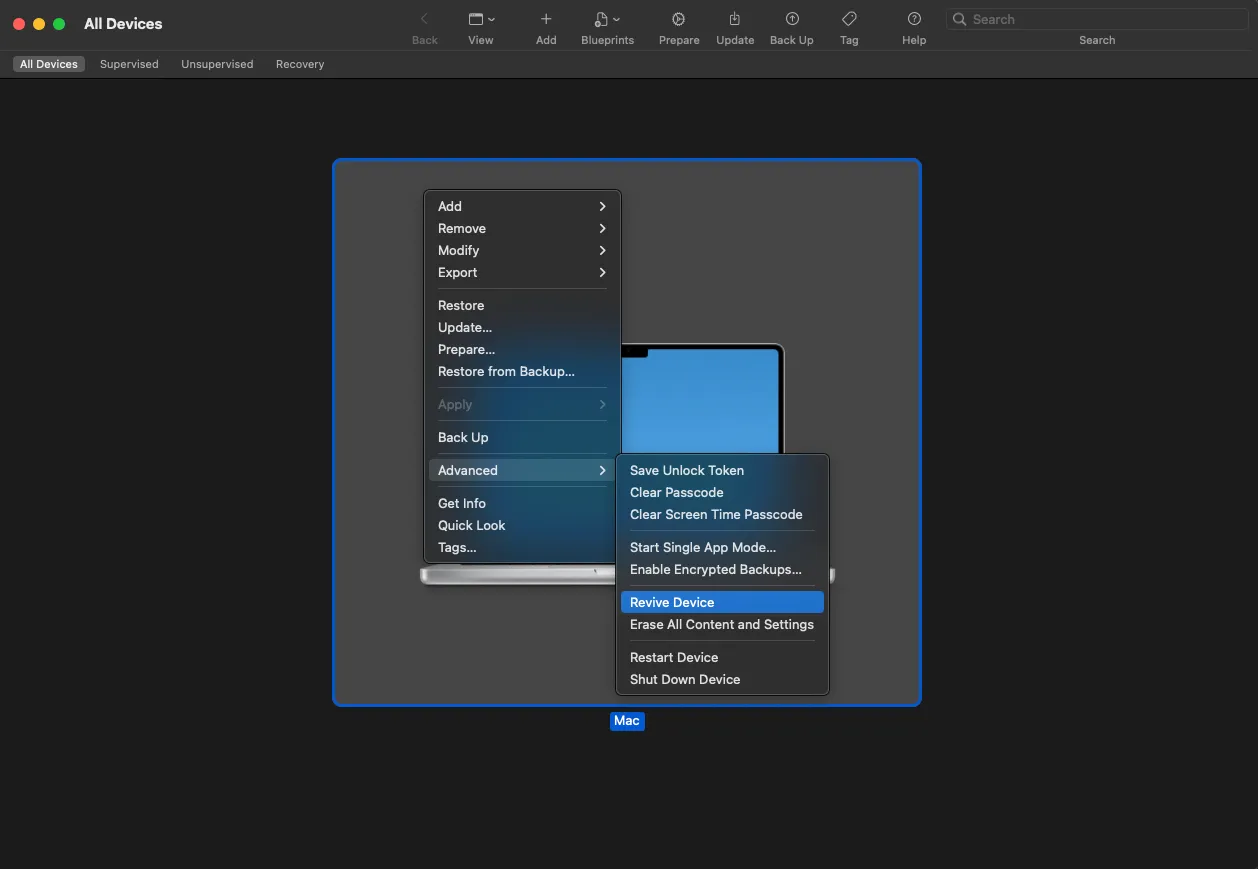
Understanding Recovery Menu Options
Revive Device: This option attempts to restore the firmware while preserving user data. It’s the least invasive recovery method and should be tried first in most scenarios.
Restore: A complete system restoration that erases all data and reinstalls the operating system from scratch. Use this when Revive Device fails or when data corruption is suspected.
Advanced Options: Provides access to specialized recovery functions including custom firmware installations and diagnostic modes.
Troubleshooting Common Apple Configurator Issues
Issue 1: “Device Not Booted” Error
Problem: Apple Configurator displays an error message stating “Configurator could not perform the requested action because the device is not booted” when attempting recovery operations.
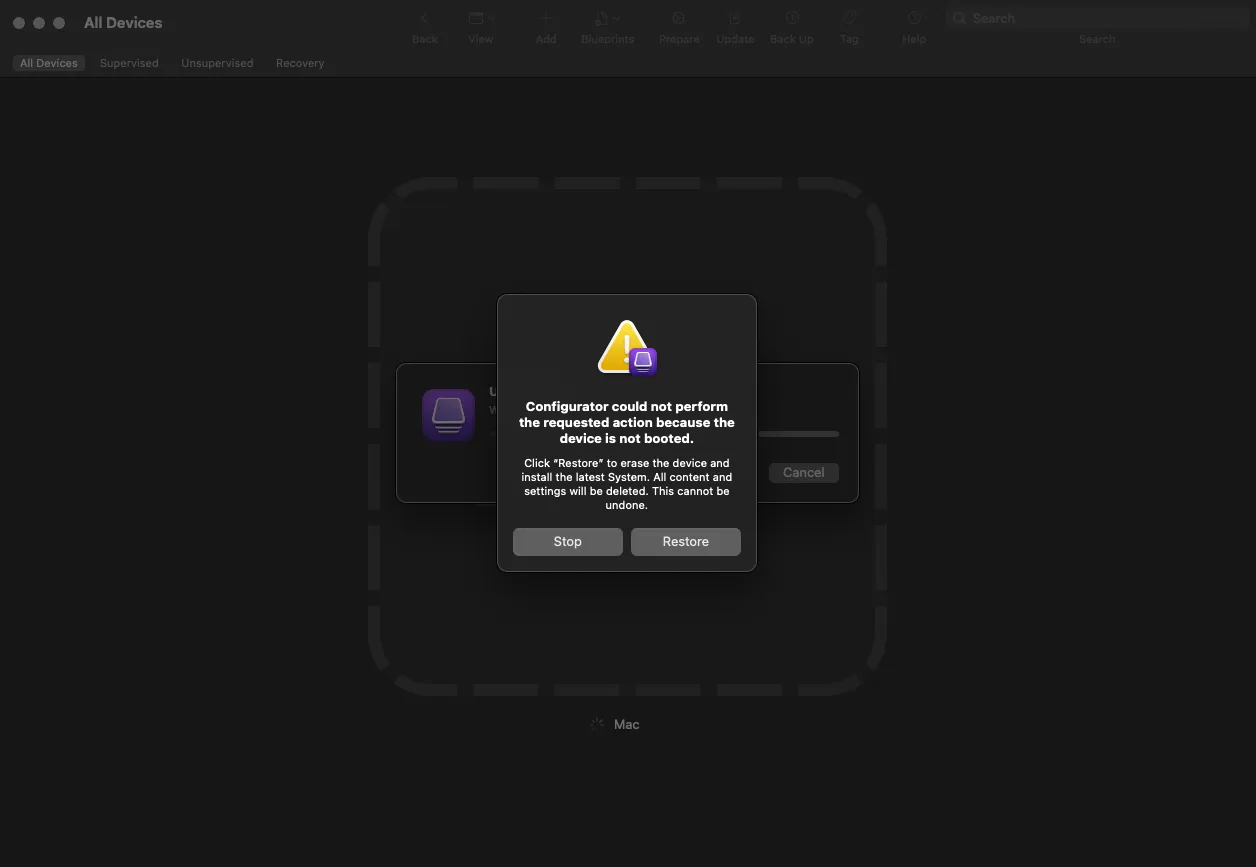
Solution:
- Verify the target Mac is completely powered off
- Disconnect and reconnect the USB-C cable
- Try entering DFU mode again with precise timing
- If error persists, click “Restore” instead of other recovery options
- The restore process can proceed even when the device shows as “not booted”
Prevention: Always ensure the target Mac is completely shut down before initiating recovery procedures. Avoid interrupting the recovery process once it begins.
Issue 2: Recovery Process Stalling or Freezing
Problem: The recovery process begins but stops responding during firmware download or installation phases.
Solution:
- Check internet connection stability on the helper Mac
- Restart Apple Configurator and attempt recovery again
- Try using a different USB-C cable or port
- Clear Apple Configurator cache by quitting and relaunching the application
- Ensure the helper Mac has sufficient free storage space
Prevention: Maintain a stable internet connection throughout the recovery process and avoid using the helper Mac for other intensive tasks during recovery.
Issue 3: Firmware Download Failures
Problem: Apple Configurator cannot download the necessary firmware files for system recovery.
Solution:
- Verify internet connectivity and DNS resolution
- Temporarily disable firewall and VPN connections
- Check Apple’s system status page for server availability
- Try recovery during off-peak hours when Apple servers are less congested
- Reset network settings on the helper Mac if problems persist
Advanced Recovery Techniques and Best Practices
Monitoring Recovery Progress
Apple Configurator provides detailed progress indicators during the recovery process. The interface shows multiple phases including preparation, firmware download, device preparation, and system installation.

Each phase serves a specific purpose:
- Step 1 – Preparation: Apple Configurator establishes secure communication with the target device and verifies hardware compatibility
- Step 2 – Firmware Download: The application downloads the appropriate firmware package from Apple’s servers based on the device model and current requirements
- Step 3 – Device Preparation: The target Mac’s firmware is prepared to receive the new system installation
- Step 4 – Installing System: The complete operating system is installed, including all necessary system files and configurations
Post-Recovery Device Setup
After successful recovery, your Mac will restart and display the initial setup screen. This process is identical to setting up a new Mac, requiring you to configure user accounts, network settings, and system preferences from scratch.
Data Recovery and Backup Strategies
Pre-Recovery Data Considerations
Before initiating Apple Configurator recovery, it’s crucial to understand that this process will completely erase all data on the target Mac. If possible, attempt these data recovery steps first:
- Try Target Disk Mode to access files from another Mac
- Use disk utility tools to create disk images of important partitions
- Remove the internal storage drive and connect it externally for data recovery
- Contact professional data recovery services for critical business data
Setting Up Automated Backups Post-Recovery
Once your Mac is restored and operational, implement robust backup strategies to prevent future data loss:
# Enable Time Machine with external drive
sudo tmutil setdestination /Volumes/BackupDrive

# Configure automated daily backups
sudo tmutil enable

# Set up additional cloud backup verification
defaults write com.apple.TimeMachine DoNotOfferNewDisksForBackup -bool YES
Performance Optimization After Recovery
System Health Verification
After completing the recovery process, perform comprehensive system health checks to ensure optimal performance:
# Run disk utility verification
sudo fsck -fy /dev/disk1

# Check system integrity
sudo ditto --check /System/Library

# Verify permissions and ownership
sudo diskutil resetUserPermissions / `whoami`

# Update all software components
softwareupdate -ia --verbose
Hardware Diagnostic Testing
Perform hardware diagnostics to identify any underlying issues that may have contributed to the original boot failure:
- Run Apple Diagnostics by holding D during startup
- Test memory integrity using built-in diagnostic tools
- Verify storage health with disk utility
- Check thermal management and fan operations
- Test all external connectivity ports and features
Real-World Use Cases and Examples
Case Study 1: MacBook Pro Recovery After Failed macOS Ventura Update
A MacBook Pro 16-inch (2021) experienced boot failure after an interrupted macOS Ventura update. The device displayed a black screen with no response to standard recovery key combinations. Using Apple Configurator, the recovery process involved:
- Establishing DFU mode connection with a helper Mac Studio
- Initial “Revive Device” attempt failed due to corrupted firmware
- Complete “Restore” process successfully reinstalled the system
- Total recovery time: 90 minutes including firmware download
- Post-recovery performance testing showed normal operation
The key factors for success included using a stable internet connection and allowing the complete recovery process to finish without interruption.
Case Study 2: Mac Studio Recovery in Professional Environment
A Mac Studio used for video editing became unresponsive during a security update installation. The device showed symptoms of firmware corruption with partial boot sequences that never completed. The recovery approach included:
- Initial assessment revealed the device could enter DFU mode successfully
- Apple Configurator recognized the hardware but showed system corruption
- Recovery process required two attempts due to initial network timeout
- Professional data recovery services extracted critical project files before restoration
- Complete system restore followed by professional software reinstallation
This case highlighted the importance of professional data recovery services when dealing with business-critical information and the need for redundant backup systems in professional environments.
Security Considerations and Best Practices
Firmware Security Implications
Apple Configurator recovery processes involve firmware-level operations that bypass normal security mechanisms. Understanding the security implications is crucial:
- Recovery process requires disabling Secure Boot temporarily
- Firmware verification occurs automatically during restoration
- All security certificates and encryption keys are regenerated
- FileVault encryption must be reconfigured after recovery
- Touch ID and Face ID data require complete re-enrollment
Network Security During Recovery
The recovery process involves downloading firmware and system files from Apple’s servers. Ensure network security by:
- Using trusted networks with verified SSL certificates
- Avoiding public WiFi networks during firmware downloads
- Verifying digital signatures on downloaded recovery files
- Monitoring network traffic for unusual activity during recovery
Frequently Asked Questions (FAQ)
Q: How long does the Apple Configurator recovery process typically take?
A: The complete recovery process usually takes 60-120 minutes, depending on your internet connection speed and the specific Mac model. The firmware download phase typically accounts for 30-50% of the total time, while system installation and verification comprise the remainder.
Q: Can I recover data after using Apple Configurator restoration?
A: No, Apple Configurator restoration completely erases all data on the target Mac. Any data recovery must be performed before initiating the restoration process using specialized tools or professional services.
Q: What should I do if my Mac doesn’t appear in Apple Configurator?
A: First, verify that you’re using a proper USB-C cable and that both Macs are connected correctly. Try different USB-C ports on both devices. Ensure the target Mac is completely powered off before attempting to enter DFU mode. If problems persist, try resetting the SMC (System Management Controller) on both devices.
Q: Is Apple Configurator recovery method safe for all Mac models?
A: Yes, Apple Configurator is designed to work safely with all Mac models that support DFU mode. The software automatically detects the appropriate firmware and recovery procedures for each specific model. However, always ensure you’re using the latest version of Apple Configurator for best compatibility.
Q: Can I use Apple Configurator on the same Mac that needs recovery?
A: No, you must use a separate, functioning Mac to run Apple Configurator. The recovery process requires the target Mac to be in a non-functional state (DFU mode) while the helper Mac manages the recovery operations.
Q: What happens if the recovery process is interrupted?
A: If the recovery process is interrupted (due to power loss, network disconnection, or cable disconnection), you can typically restart the process from the beginning. The target Mac will remain in DFU mode and can be recovered again. However, repeated interruptions may require contacting Apple Support for advanced recovery procedures.
Q: Do I need an Apple ID to use Apple Configurator for recovery?
A: No, Apple Configurator recovery does not require an Apple ID. The software downloads firmware directly from Apple’s servers without authentication requirements. However, you will need to sign in with an Apple ID during the post-recovery setup process on the restored Mac.
Q: Can Apple Configurator fix hardware-related boot issues?
A: Apple Configurator can only resolve software and firmware-related boot issues. If your Mac has hardware problems (failing storage, defective RAM, or motherboard issues), the recovery process may fail or the device may continue experiencing problems after recovery. Hardware issues require professional repair or component replacement.
Conclusion and Next Steps
Key Takeaways
- Apple Configurator provides a powerful solution for recovering Macs with severe boot failures that cannot be resolved through standard recovery methods
- The recovery process requires a second Mac and completely erases all data on the target device, making pre-recovery data backup planning essential
- Understanding DFU mode entry procedures for different Mac models ensures successful device recognition and recovery initiation
- Common recovery issues like “device not booted” errors can often be resolved by using the complete restore option rather than less invasive recovery methods
- Post-recovery system optimization and comprehensive backup setup prevent future catastrophic data loss scenarios
What’s Next?
After successfully recovering your Mac using Apple Configurator, focus on implementing robust backup strategies including Time Machine, cloud synchronization, and regular system health monitoring. Consider upgrading your storage solution to include redundancy for critical data and establish regular maintenance routines to prevent future system corruption issues.