Table of Contents
- Introduction to diskutil
- Basic Syntax and Options
- Listing and Inspecting Disks
- Mounting and Unmounting Volumes
- APFS Container and Volume Management
- Disk Partitioning Operations
- Erasing and Formatting Disks
- Repair and Verification
- Advanced Operations
- Common Issues and Troubleshooting
- Best Practices and Security Considerations
- Conclusion
Introduction to diskutil
The diskutil command is macOS’s powerful command-line utility for disk and volume management, serving as the terminal counterpart to the Disk Utility GUI application. With macOS Sequoia 15.5’s latest improvements and APFS optimizations, understanding diskutil becomes even more crucial for system administrators, developers, and power users who need precise control over disk operations.
Unlike the graphical Disk Utility, diskutil provides advanced functionality and granular control over disk operations, including hidden partitions like EFI, Preboot, and Recovery volumes. This comprehensive guide covers everything from basic operations to advanced APFS container management, ensuring you can effectively manage storage in modern macOS environments.
What’s New in macOS Sequoia 15.5
macOS Sequoia 15.5 introduces several important updates affecting disk management:
- AFP Deprecation: Apple Filing Protocol (AFP) is now deprecated and will be removed in future versions
- Enhanced APFS Performance: Improved APFS container operations and volume management
- Security Updates: 39+ security vulnerabilities addressed, including disk encryption improvements
- Apple Silicon Optimizations: Better M1/M2/M3/M4 chip compatibility for disk operations
Basic Syntax and Options
The diskutil command follows a consistent verb-based syntax pattern:
diskutil [verb] [options] [device/volume]Essential Command Structure
Most diskutil operations require administrative privileges for write operations, while read-only operations can be performed by any user:
# Read-only operations (no sudo required)
diskutil list
diskutil info disk1s1

# Write operations (sudo required)
sudo diskutil mount disk1s2
sudo diskutil unmount /Volumes/MyDrive
Common Options and Flags
-plist: Output results in property list format for programmatic parsing-quiet: Suppress progress messages-force: Force operations that might otherwise fail due to safety checks-verbose: Display detailed operation information
Listing and Inspecting Disks
Basic Disk Listing
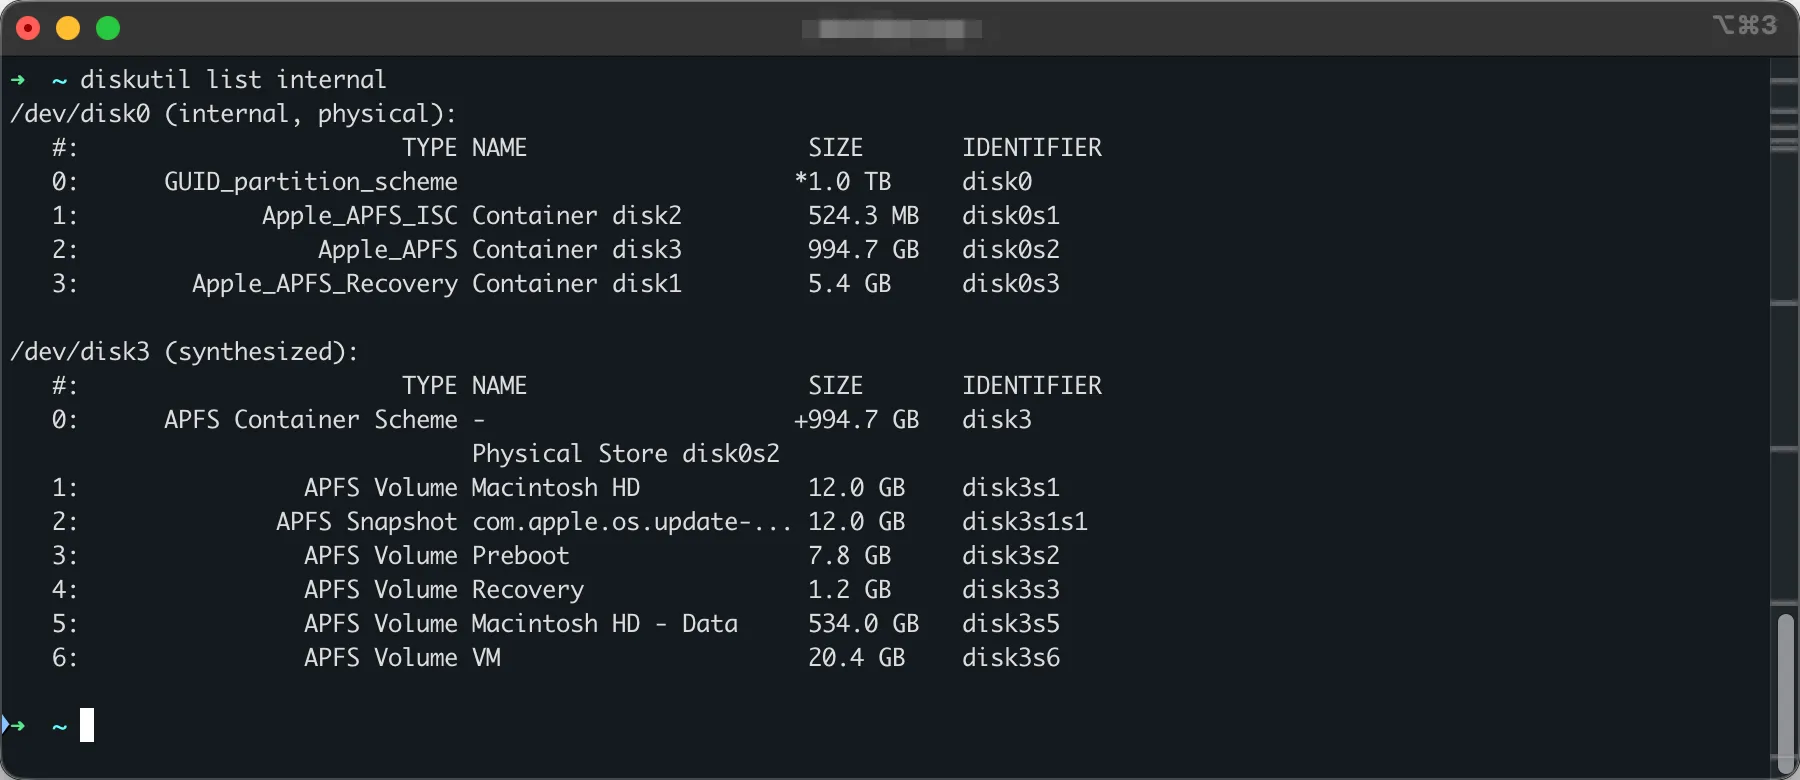
The foundation of disk management starts with understanding what storage devices are available:
# List all disks and partitions
diskutil list

# List specific disk with details
diskutil list disk0

# List only external disks
diskutil list -plist | grep external
Understanding Disk Identifiers
macOS uses a systematic naming convention for disk identifiers:
disk0: First physical disk (usually internal SSD)disk0s1: First slice/partition on disk0disk1: Synthesized APFS container diskdisk1s1: First APFS volume in container
Detailed Disk Information
Get comprehensive information about any disk or volume:
# Detailed info about a specific disk
diskutil info disk0s2

# Get information in plist format for scripting
diskutil info -plist disk1s1

# Check if a volume is mounted
diskutil info /Volumes/MyDrive | grep "Mounted"
Mounting and Unmounting Volumes
Mounting Operations
Proper mounting is essential for accessing volume data safely:
# Mount by device identifier
sudo diskutil mount disk1s2

# Mount by volume name
sudo diskutil mount "My External Drive"

# Mount with specific options
sudo diskutil mount -mountOptions rdonly,nobrowse disk1s3

# Mount all volumes on a disk
sudo diskutil mountDisk disk2
Unmounting and Ejecting
Always unmount properly before physically disconnecting storage:
# Unmount a volume
sudo diskutil unmount /Volumes/MyDrive

# Force unmount if volume is busy
sudo diskutil unmount force /Volumes/MyDrive

# Eject entire disk (unmounts all volumes)
sudo diskutil eject disk2

# Unmount all volumes on a disk
sudo diskutil unmountDisk disk2
APFS Container and Volume Management
Understanding APFS Architecture
Apple File System (APFS) introduced in macOS High Sierra uses a container-based architecture where multiple volumes share space dynamically within containers.
APFS Container Operations
# List all APFS containers and volumes
diskutil apfs list

# Create new APFS container
sudo diskutil apfs createContainer disk0s2

# Resize APFS container
sudo diskutil apfs resizeContainer disk1 100g

# Delete APFS container (destructive!)
sudo diskutil apfs deleteContainer disk1
APFS Volume Management
Manage individual volumes within APFS containers:
# Add new APFS volume to container
sudo diskutil apfs addVolume disk1 APFS "MyNewVolume"

# Add encrypted volume with password prompt
sudo diskutil apfs addVolume disk1 APFS "SecureVolume" -passphrase

# Add volume with quota and reserve limits
sudo diskutil apfs addVolume disk1 APFS "LimitedVolume" -quota 50g -reserve 10g

# Delete APFS volume
sudo diskutil apfs deleteVolume disk1s3

# Rename APFS volume
sudo diskutil rename disk1s2 "NewVolumeName"
APFS Encryption and Security
# Encrypt existing APFS volume
sudo diskutil apfs encryptVolume disk1s1 -user diskutil

# Decrypt APFS volume
sudo diskutil apfs decryptVolume disk1s1

# Lock/unlock encrypted volumes
sudo diskutil apfs lockVolume disk1s1
sudo diskutil apfs unlockVolume disk1s1
Disk Partitioning Operations
Partition Schemes
Modern Macs use GPT (GUID Partition Table), while legacy systems may use MBR or APM:
- GPT: Modern standard for Intel and Apple Silicon Macs
- MBR: Legacy DOS/Windows compatibility
- APM: Apple Partition Map for older PowerPC Macs
Creating Partitions
# Partition disk with single partition
sudo diskutil partitionDisk disk2 1 GPT APFS "MyDrive" 100%

# Create multiple partitions
sudo diskutil partitionDisk disk2 2 GPT APFS "Volume1" 50% ExFAT "Volume2" 50%

# Partition with specific filesystem
sudo diskutil partitionDisk disk2 1 GPT "HFS+" "MacVolume" 100%
Modifying Existing Partitions
# Add partition to existing disk
sudo diskutil addPartition disk0s2 APFS "NewPartition" 20g

# Resize existing partition
sudo diskutil resizeVolume disk1s1 50g

# Split existing partition
sudo diskutil splitPartition disk0s3 2 APFS "Part1" 25g ExFAT "Part2" 25g
Erasing and Formatting Disks
Basic Erase Operations
Warning: Erase operations are destructive and will permanently delete all data.
# Erase volume with APFS
sudo diskutil eraseVolume APFS "NewName" disk1s2

# Erase entire disk
sudo diskutil eraseDisk APFS "DiskName" disk2

# Erase with specific format
sudo diskutil eraseVolume "MS-DOS FAT32" "USBDrive" disk2s1
Secure Erase Options
For security-sensitive data, use secure erase methods:
# Zero-fill erase (single pass)
sudo diskutil zeroDisk disk2

# Random data erase
sudo diskutil randomDisk disk2

# Multi-pass secure erase (very slow)
sudo diskutil secureErase freespace 3 /Volumes/MyVolume
Supported File Systems
View available file system formats:
# List supported file systems
diskutil listFilesystems
Common file systems include:
- APFS: Default for macOS (case-sensitive available)
- HFS+: Legacy Mac format (Journaled recommended)
- ExFAT: Cross-platform compatibility
- MS-DOS FAT32: Universal compatibility with size limits
Repair and Verification
File System Verification
Regular verification helps maintain disk health:
# Verify volume file system
diskutil verifyVolume disk1s1

# Verify disk structure
diskutil verifyDisk disk0

# Check APFS container
diskutil apfs verifyContainer disk1
Repair Operations
# Repair volume file system
sudo diskutil repairVolume disk1s1

# Repair disk structure
sudo diskutil repairDisk disk0

# First Aid equivalent (verify then repair)
sudo diskutil repairVolume disk1s1
Permission Repairs
In modern macOS, permission repairs are largely automated, but can be triggered manually:
# Reset permissions (macOS 10.11+)
sudo diskutil resetUserPermissions / `id -u`
Advanced Operations
Core Storage and Fusion Drive Management
For Fusion Drive systems (combining SSD and HDD):
# List Core Storage volumes
diskutil cs list

# Create Fusion Drive
sudo diskutil cs create "Fusion Drive" disk0 disk1

# Reset Fusion Drive to factory state
sudo diskutil resetFusion
RAM Disk Creation
Create temporary RAM-based storage for high-speed operations:
# Create 1GB RAM disk
diskutil erasevolume HFS+ "RAMDisk" `hdiutil attach -nomount ram://2097152`
Disk Image Operations
# Create disk image from volume
sudo hdiutil create -srcvolume /Volumes/MyVolume ~/Desktop/backup.dmg

# Mount disk image
hdiutil mount ~/Desktop/backup.dmg

# Unmount disk image
hdiutil unmount /Volumes/MyVolume
Common Issues and Troubleshooting
Volume Won’t Mount
When volumes fail to mount, try these steps:
# Check disk for errors
diskutil verifyVolume disk1s1

# Force mount with different options
sudo diskutil mount -mountOptions rdonly disk1s1

# Check file system type
diskutil info disk1s1 | grep "File System"
Disk Appears as Read-Only
# Check mount options
mount | grep disk1s1

# Remount with write permissions
sudo diskutil unmount disk1s1
sudo diskutil mount disk1s1
APFS Container Issues
Common APFS problems and solutions:
# Update preboot volume
sudo diskutil apfs updatePreboot disk1s1

# Fix APFS snapshot issues
diskutil apfs list | grep snapshot

# Repair APFS container
sudo diskutil apfs repairContainer disk1
External Drive Recognition Problems
# Refresh disk arbitration
sudo pkill -f diskarbitrationd

# Check system log for errors
log show --predicate 'subsystem == "com.apple.DiskArbitration"' --last 1h
Best Practices and Security Considerations
Data Protection Guidelines
- Always backup before disk operations: Use Time Machine or create disk images
- Verify operations: Use
diskutil verifyVolumeafter modifications - Use proper unmounting: Never force-disconnect without unmounting
- Monitor disk health: Regular verification prevents data loss
Security Best Practices
# Enable FileVault for system volumes
sudo fdesetup enable

# Use encrypted APFS volumes for sensitive data
sudo diskutil apfs addVolume disk1 APFS "SecureData" -passphrase

# Secure erase before disposal
sudo diskutil randomDisk disk2
Performance Optimization
- APFS benefits: Use APFS for macOS volumes (faster than HFS+)
- SSD optimization: Enable TRIM support for third-party SSDs
- Container sizing: Don’t over-partition APFS containers
Scripting and Automation
Use plist output for reliable scripting:
#!/bin/bash
# Example: Check if volume is mounted
VOLUME_INFO=$(diskutil info -plist "MyVolume" 2>/dev/null)
if [ $? -eq 0 ]; then
    MOUNTED=$(echo "$VOLUME_INFO" | grep -A1 "Mounted" | tail -1)
    if [[ "$MOUNTED" == *"true"* ]]; then
        echo "Volume is mounted"
    fi
fi
Conclusion
The diskutil command is an indispensable tool for macOS disk management, offering capabilities far beyond the graphical Disk Utility application. With macOS Sequoia 15.5’s improvements and the evolution of APFS, understanding these command-line operations becomes increasingly important for maintaining and optimizing Mac storage systems.
From basic mounting and unmounting operations to complex APFS container management, diskutil provides the precision and control needed for professional macOS administration. Remember to always prioritize data safety through proper backups and verification procedures.
As Apple continues to deprecate older protocols like AFP and enhance APFS functionality, staying current with diskutil capabilities ensures you can effectively manage storage across all supported macOS versions. Whether you’re a system administrator managing multiple Macs or a power user optimizing your personal setup, mastering diskutil is essential for effective macOS storage management.
Additional Resources
- Apple’s official diskutil manual:
man diskutil - APFS reference guide: Apple Developer Documentation
- macOS Storage Management: Apple Support
- File system compatibility charts for cross-platform usage
Always test commands in safe environments before applying them to production systems, and maintain regular backups of critical data regardless of the disk management operations you perform.
I am curious about creating VolumeGroups. Actually the typical combination of a system/data pair. I had success with creating an empty DATA volume and then using the addVolume + groupWith option. This allows to create a GROUP and also the additional SYSTEM volume in one go. So far so good… What’s not explained anywhere: the manual and command description shows an option called “-sibling” ! But no information about the meaning and usage? Any clues? Another related question: Since one can create a VolumeGroup with a new system volume… How would you create a VolumeGroup with an EXISTING system volume? Or let’s say, with two volumes that already contain data?
Thanks in advance. Best regards, Maik.
Regarding your questions about Volume Groups, here is some information that might help:
1. About the “-sibling” option: I checked the man page syntax for addVolume and found this line: [-group[With] | -sibling groupDevice]
The pipe symbol (|) indicates an “OR” condition. This confirms that -sibling is simply an alias or synonym for -groupWith. They serve the exact same purpose: specifying the target volume you want to pair with. Apple likely kept the internal development term “sibling” in the code but focused on “groupWith” for the documentation.
2. About grouping EXISTING volumes: You asked how to create a VolumeGroup with two volumes that already contain data. This is extremely difficult in macOS and is generally not supported.
The reason is that a macOS Volume Group is not just a naming convention; it relies on a technology called Firmlinks to “map” directories from the Data volume into the System volume’s read-only file system, making them appear as a unified whole.
This complex directory mapping relationship is usually established at the exact moment of system installation or volume group creation. Simple command-line tools cannot safely “merge” two volumes that are already populated with arbitrary data into a logical System/Data volume group.
Hope this clears things up! 😎